Content from Introduction
Last updated on 2024-10-18 | Edit this page
Estimated time: 10 minutes
Overview
Questions
- Why would you want to build an HPC for training?
Objectives
- Explain the the reasons (advantages) for building an HPC for training.
Introduction
When running a workshop to teach learners how to use an HPC, an instructor is immediately presented with a few problems:
- Very few users ever get to see an HPC in real life and it is left to imaginations and sci-fi movies to visualise what an HPC is. To many this is quite a scary concept.
- Training on a “real” HPC can cause learners to be anxious that they might “break” something.
- Access to an HPC needs to be arranged. This is not always a trivial task as the use of HPC resources can be quite restricted in terms of who are allowed to use a specific HPC.
- Workshop attendees often do not read their emails requesting them to create accounts before they turn up for the workshop which results in instructors having to create accounts on the day. Apart from quite often delaying the start of the workshop, it is also not always possible for instructors to create the user accounts on the day.
- HPC resources are always in demand and running a workshop on a “real” HPC takes resources away from “real” processes running at the time.
- HPCs typically have to be connected to via the Internet. Any issues with accessing the Internet will affect the workshop.
- If an HPC is heavily used or if someone runs a job on the login node, learners might not be able to log in or there are significant delays in getting jobs into queues which again affects the timing of the workshop.
All these mentioned issues (and probably more) can be addressed by having a dedicated HPC for training. But usually “real” HPCs are very expensive and it wouldn’t be feasible to purchase typical high-end HPC hardware just for a training setup. However, it is completely possible to use low-end hardware to create a cluster that will run almost all the required software to learn how to use an HPC.
Key Points
- What is an HPC?
- What would be the advantages of having an HPC dedicated to training?
Content from Preparing an SD Card
Last updated on 2024-10-19 | Edit this page
Estimated time: 50 minutes
Overview
Questions
- Where do you download the Raspberry Pi Imager from?
- Where do you download the CarpentriesOffline image from?
- How do you install the Raspberry Pi imager on your computer?
- What is the CarpentriesOffline image?
- What is the Raspberry Pi Imager used for?
Objectives
- download and install the Raspberry Pi imager
- download and install the CarpentriesOffline image
- write the CarpentriesOffline image to the SD Card
Introduction
Every computer needs to load an operating system when you switch it on. Therefore it will usually have a default place where it will look for an operating system in the first place. The process of loading the operating system is called booting. In general, if someone tells you to reboot your computer it means to switch is off and switch it back on again so that the operating system can be loaded from scratch. In the case of your desktop or laptop computers you will have a hard drive built into the computer or alternatively you might be able to boot from a USB device.
In the case of the Raspberry Pi its default booting device is an SD card. Pre-RPi3 used a mini-SD card but RPi3 and RPi4 use micro-SD cards. SD cards are available in various capacities, ie. the amount of information that can be stored on it. A basic operating system for the Pi will probably take about 2GB but then you will also need space for all the Carpentries lesson files and other software that you want to make available to the learners.
Usually when you buy a RPi you can also buy an SD card with the operating system pre-loaded. Alternatively you can buy an empty SD card and prepare it yourself. Preparing the SD card involves downloading an image of the operating system (and there are various versions available), downloading the software, Raspberry Pi Imager, required for writing the image to the SD card and then using the software to write the image to the SD card.
Internet connectivity might prove to be a problem during this workshop so your instructor might bring an image along that can be copied or perhaps they will provide pre-prepared microSD cards.
Challenge 1: What software do you need to prepare an SD card?
- Word
- Excel
- Raspberry Pi Imager
- LibreOffice
- SonicPi
- Word cannot be used to prepare an SD card, it is a word processor
- Excel cannot be used to prepare an SD card, it is a spreadsheet
- The correct answer is 3
- LibreOffice is an office suite and connot be used to prepare an SD card
- SonicPi is a live coding environment to support computing and music lessons in schools.
The Raspberry Pi can run several operating systems including several flavours of Linux. The official Raspberry Pi OS is based on Debian Linux.
If you have not already done so you have to download and install the Raspberry Pi Imager. Using your browser, navigate to the Raspberry Pi download page. You should now be able to select the download for your operating system. Click on the appropriate link and save the installation file to your computer. The web page will provide further information for installing the software on your computer. Once the installation is complete you should be able to run the Imager which will open with the following screen:

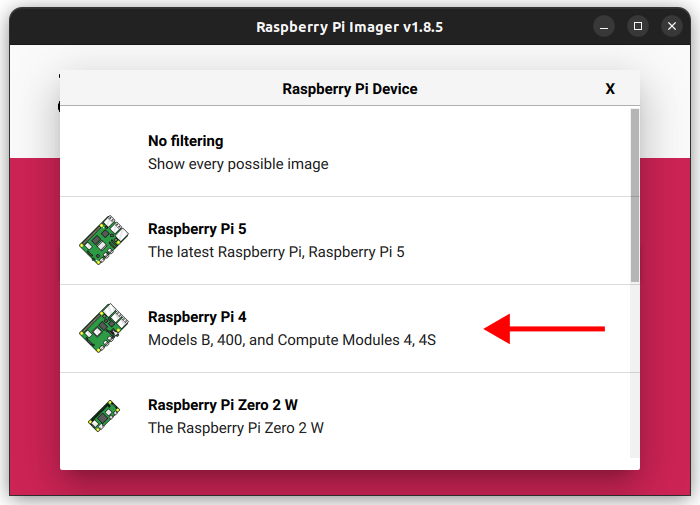
You can now click on the Choose OS button which will open a window for selecting the image you want to write to the SD card. Scroll down to the bottom where you should find an option Raspberry Pi OS (other). Click on that option:
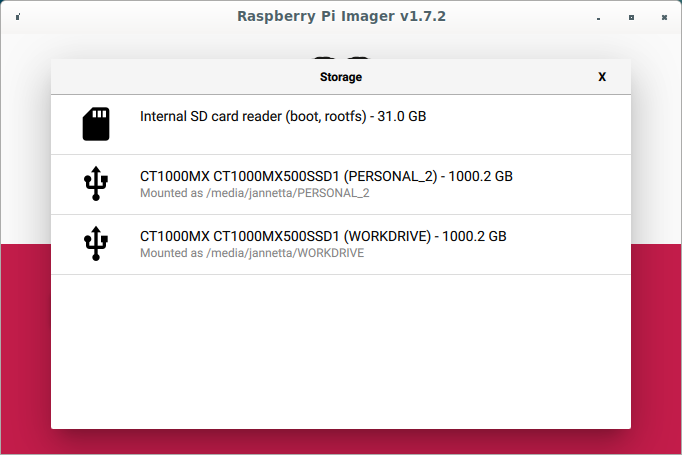
Select Raspberry Pi OS Lite (64 bit). Make sure you have inserted the SD card into your computer. Now click on the Choose Storage button and select the device you want to write the image to:
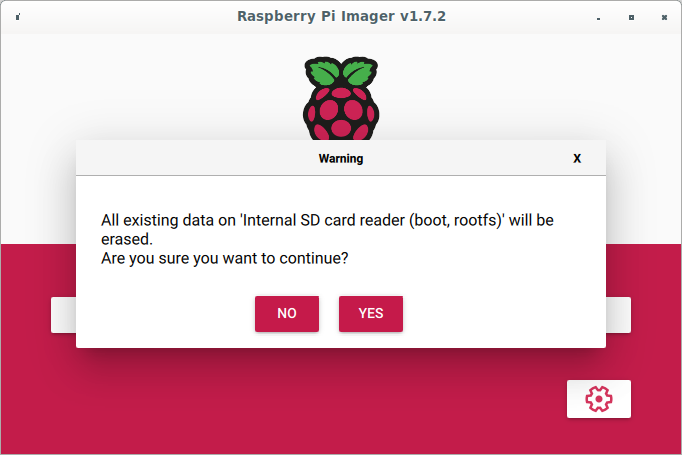
Once you have selected the Storage device, click the WRITE button. You will be prompted to overwrite the information on the SD card, click on YES to accept.
The image will now be written to the SD card. 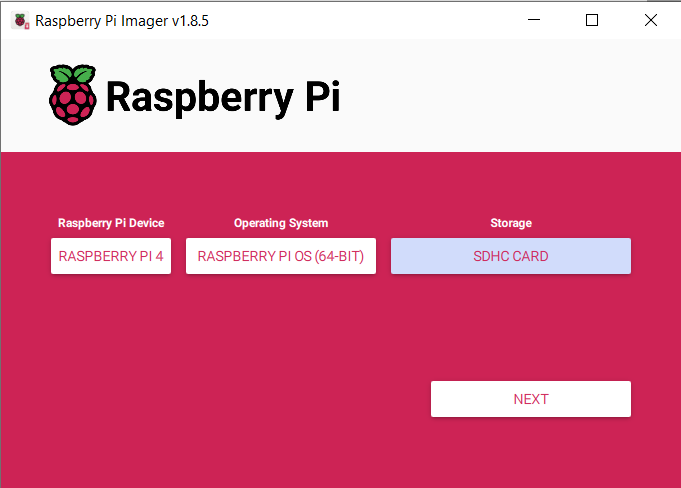
Once the image has been written to the SD card a Write Successful message will be displayed.
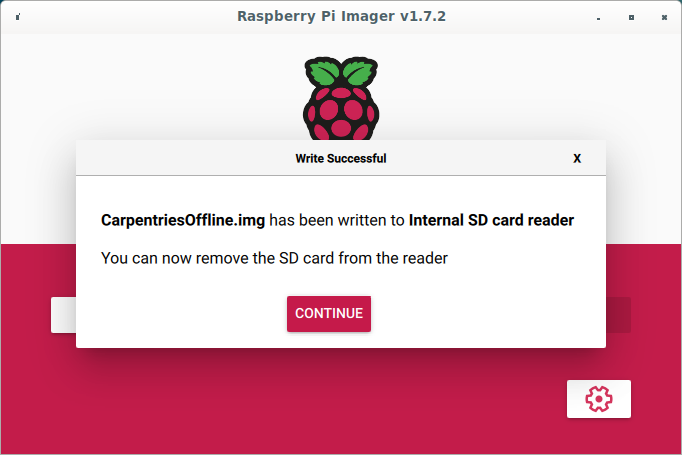
You can now remove the SD card from your computer and insert it into the Raspberry Pi.
Key Points
- Know where to download the Raspberry Pi Imager from
- Know how to install the Raspberry Pi Imager
- Know where to download the CarpentriesOffline RPi image
- Know how to write the CarpentriesOffline image to an SD card
Content from Booting and Updating
Last updated on 2024-10-19 | Edit this page
Estimated time: 15 minutes
Overview
Questions
- Why and how should the operating system be updated?
- Why and how should the operating system be upgraded?
- What software is required to turn the networked computers into a cluster?
- How does one go about installing the software?
Objectives
- Update all software on the installation
- Upgrade all software on the installation
- Identify what other software needs to be installed
Running the OS for the first time
Once you have written the operating system to the microSD card you can insert the card into the RPi and switch it on. If you configured the OS with a Wifi SSID and enabled ssh you should be able to access the RPi via the wireless network using your desktop or laptop computer.
Key Points
- What have we learnt?
Content from An episode
Last updated on 2024-10-18 | Edit this page
Estimated time: 10 minutes
Overview
Questions
- Questions to ask
Objectives
- Objectives
Text
Some text.
Key Points
- What have we learnt?
Content from An episode
Last updated on 2024-10-18 | Edit this page
Estimated time: 10 minutes
Overview
Questions
- Questions to ask
Objectives
- Objectives
Text
Some text.
Key Points
- What have we learnt?
Content from An episode
Last updated on 2024-10-18 | Edit this page
Estimated time: 10 minutes
Overview
Questions
- Questions to ask
Objectives
- Objectives
Text
Some text.
Key Points
- What have we learnt?
Content from An episode
Last updated on 2024-10-18 | Edit this page
Estimated time: 10 minutes
Overview
Questions
- Questions to ask
Objectives
- Objectives
Text
Some text.
Key Points
- What have we learnt?